> ## Documentation Index
> Fetch the complete documentation index at: https://docs.pelanor.io/llms.txt
> Use this file to discover all available pages before exploring further.
# Single Sign-On (SSO)
> Connect your IdP to Pelanor to facilitate seamless login Sign-On (SSO) using OIDC (OpenIDC Connect).
**Before you begin:** You’ll need a unique organization\_id.\
Contact your Account Manager or Pelanor Support to obtain it.
***
## General Workflow
Register an OIDC app in your IdP (Azure, Okta, or JumpCloud).
Use the format:
| Environment | Redirect URI format |
| ------------ | --------------------------------------------------------------------- |
| US (default) | `https://app.pelanor.io/api/auth/callback/{idp}-{organization_id}` |
| EU | `https://app-eu.pelanor.io/api/auth/callback/{idp}-{organization_id}` |
Replace `{idp}` with `entra`, `okta`, or `jumpcloud` and `{organization_id}` with your unique value.
Assign users in your IdP that should be allowed to access Pelanor.
Share the following with Pelanor:
* Client ID
* Client Secret
* Issuer URL / IdP domain
Pelanor will notify you when the SSO connection is active.
***
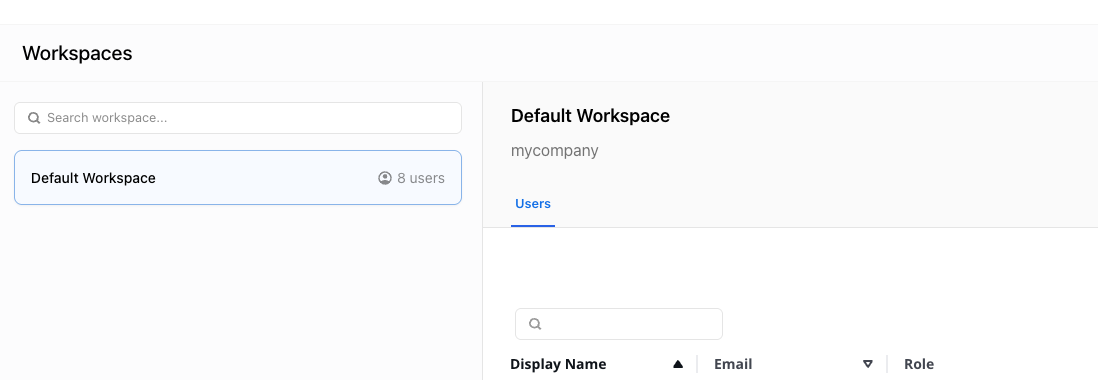
## Finding Your Organisation Name
In Pelanor, go to **Settings → Workspaces** and click **Default Workspace**.
The *subtitle* is your organization name, used for SSO login (lowercase, no spaces).
 ***
## Logging in with SSO
***
## Logging in with SSO
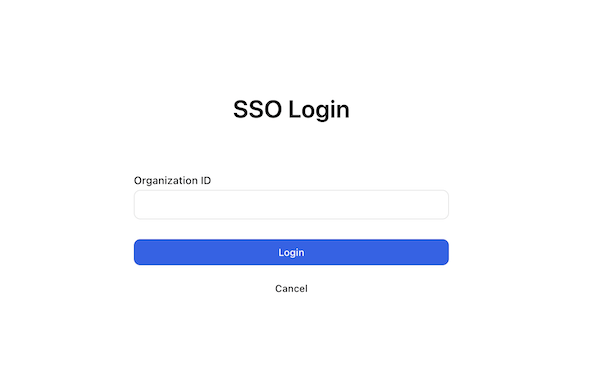 Open the Pelanor sign-in screen.
You’ll be prompted to enter your organisation name.
Enter your name (e.g., `acme`), authenticate via your IdP, and access the platform.
***
## Platform-Specific Instructions
### Microsoft Entra ID (Azure AD)
Azure Portal → **Azure Active Directory → App registrations → New registration**
Use:
* US: `https://app.pelanor.io/api/auth/callback/entra-{organization_id}`
* EU: `https://app-eu.pelanor.io/api/auth/callback/entra-{organization_id}`
* Create a secret under **Certificates & secrets**
* Copy the **Client ID** and **Issuer URL**
Navigate to **Users**, and assign Pelanor access.
***
### Okta
Okta Admin Console → **Applications → Create App Integration**
* Sign-in method: **OIDC**
* Application type: **Web**
Use:
* US: `https://app.pelanor.io/api/auth/callback/okta-{organization_id}`
* EU: `https://app-eu.pelanor.io/api/auth/callback/okta-{organization_id}`
Assign users under **Assignments**\
Copy the **Client ID**, **Client Secret**, and **Okta domain**
***
### JumpCloud
JumpCloud Admin → **USER AUTHENTICATION → SSO Applications → + Add New Application**
Select **OIDC / Custom Application**, then click Next.
* US: `https://app.pelanor.io/api/auth/callback/jumpcloud-{organization_id}`
* EU: `https://app-eu.pelanor.io/api/auth/callback/jumpcloud-{organization_id}`\
Grant Type: **Authorization Code** (enable **Refresh Token** if needed)
Copy **Client ID**, **Client Secret**, and **Issuer URL**\
Assign users via the **Assignments** tab
Open the Pelanor sign-in screen.
You’ll be prompted to enter your organisation name.
Enter your name (e.g., `acme`), authenticate via your IdP, and access the platform.
***
## Platform-Specific Instructions
### Microsoft Entra ID (Azure AD)
Azure Portal → **Azure Active Directory → App registrations → New registration**
Use:
* US: `https://app.pelanor.io/api/auth/callback/entra-{organization_id}`
* EU: `https://app-eu.pelanor.io/api/auth/callback/entra-{organization_id}`
* Create a secret under **Certificates & secrets**
* Copy the **Client ID** and **Issuer URL**
Navigate to **Users**, and assign Pelanor access.
***
### Okta
Okta Admin Console → **Applications → Create App Integration**
* Sign-in method: **OIDC**
* Application type: **Web**
Use:
* US: `https://app.pelanor.io/api/auth/callback/okta-{organization_id}`
* EU: `https://app-eu.pelanor.io/api/auth/callback/okta-{organization_id}`
Assign users under **Assignments**\
Copy the **Client ID**, **Client Secret**, and **Okta domain**
***
### JumpCloud
JumpCloud Admin → **USER AUTHENTICATION → SSO Applications → + Add New Application**
Select **OIDC / Custom Application**, then click Next.
* US: `https://app.pelanor.io/api/auth/callback/jumpcloud-{organization_id}`
* EU: `https://app-eu.pelanor.io/api/auth/callback/jumpcloud-{organization_id}`\
Grant Type: **Authorization Code** (enable **Refresh Token** if needed)
Copy **Client ID**, **Client Secret**, and **Issuer URL**\
Assign users via the **Assignments** tab